Zero Trust Networking (ZTN) is a hot new buzzword, but the concept has been around since the early 90s. At its core, ZTN is a “trust no one” approach to network security that assumes any entity on the network is a potential security threat, even those that are already inside the network perimeter. Not that there really is a true network perimeter now that we’ve moved our applications to the cloud. This blog post will give you an overview of the philosophy of Zero Trust Networking and get you started with implementing some of its best practices for Kubernetes.
What is Zero Trust Networking?
The traditional castle-and-moat approach to network security relies on the network perimeter, or the moat, to keep out unwanted intruders. Once inside the network perimeter, you have full access to all the treasures inside the castle. With ZTN, crossing the drawbridge brings you to a locked castle where all the internal doors are also locked, and it takes more than knowing the secret password to gain entry. In fact, it is full of hidden doors that you won’t even know to exist unless you have a direct need to gain entry. The best part of ZTN is that it simplifies security.
How is it implemented?
Zero Trust Networking is more than a protocol. It’s a holistic approach to securing your network and can incorporate different principles and technologies. Regardless of the implementation details, ZTN incorporates the following principles:
- Assume that the network perimeter in which you can trust components to be safe does not exist, especially with cloud-native networks. All systems are potential threats
- Keep IP addresses for applications and services on the network unlisted
- Make connected devices and applications on the network aware of only the devices and applications to which they are directly connected
- Prevent devices and applications on the network from being discovered
- Reverify and reconnect devices and applications frequently
- Transmit security telemetry to a monitoring system. Assume you are going to be compromised, and when you are, make sure you know about it!
How do I use ZTN in my Kubernetes apps?
In order to secure the applications running in your Kubernetes cluster according to the tenets of ZTN architecture, you must define policies that meet ZTN standards using the Kubernetes NetworkPolicies specification. You do this by stipulating the rules for your cluster in a YAML file, and the best part is that you don’t need to understand low-level networking concepts to do this. Since the policies are written in a familiar language, it’s easy for the developers who are most familiar with the needs of the application to write these rules rather than trying to translate the requirements for a DevOps team.
The first thing you should consider is what traffic is allowed to and from each pod in the cluster. When working with Kubernetes, ingress is used to refer to traffic coming into a pod, and egress is used to refer to the traffic going out from a pod. You’ll define the rules for ingress and egress independently of one another for each pod in your cluster.
If no network policies are configured, all pods in a cluster are non-isolated, meaning all ingress and egress traffic is allowed.
Read that again!
All connections to and from the pods in the cluster are wide open to all traffic by default! It’s up to you to secure your Kubernetes cluster!
Using Network Policy Plugins
Kubernetes and other container runtime and orchestration solutions rely on network plugins to implement the network functionality that is achieved through firewalls in a traditional network. Those plugins then use the Kubernetes Network Policies applied to your cluster to know what network rules to enforce.
Most organizations use plugins based on the Container Network Interface (CNI) spec, such as Calico and Cillium. CNI defines a common interface and a set of libraries for writing plugins to configure the network interface and works across the most popular cloud runtime environments, including Kubernetes, rkt, OpenShift, CloudFoundary, and Amazon ECS to name a few. CNI is a Cloud Native Computing project that aims to simplify container networking and prevent each runtime/orchestration solution from having to solve common problems independently. The goal of CNI is to make container networking pluggable.
Which CNI plugin you should use depends on your particular use case, and you may need to use more than one to achieve your desired configuration. You should also check with your cloud provider to see which plugins they recommend. Your cloud provider’s preferred plugins may be installed in your cluster by default, allowing you to skip that step of securing your network.
What policies should I specify?
The specific Kubernetes Network Policies you should configure depend on the structure of your application, but there are some essential guidelines you should apply when designing your network policies.

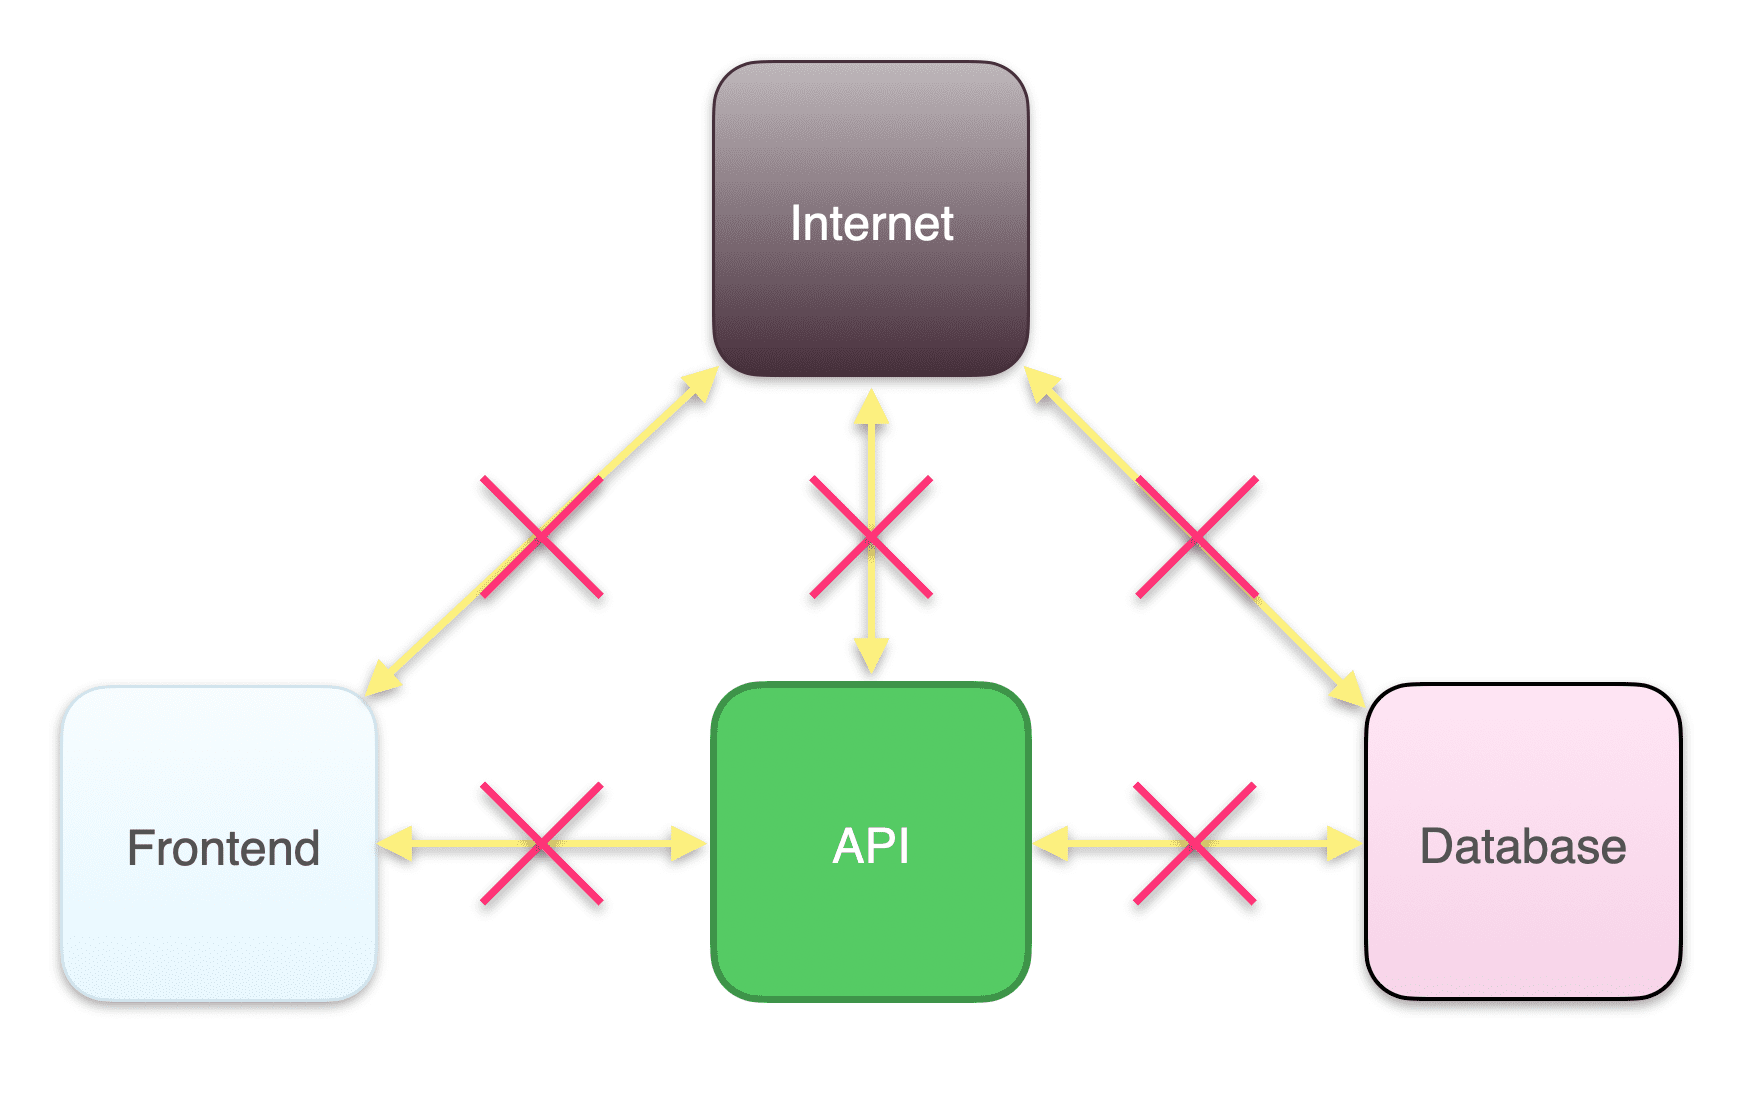
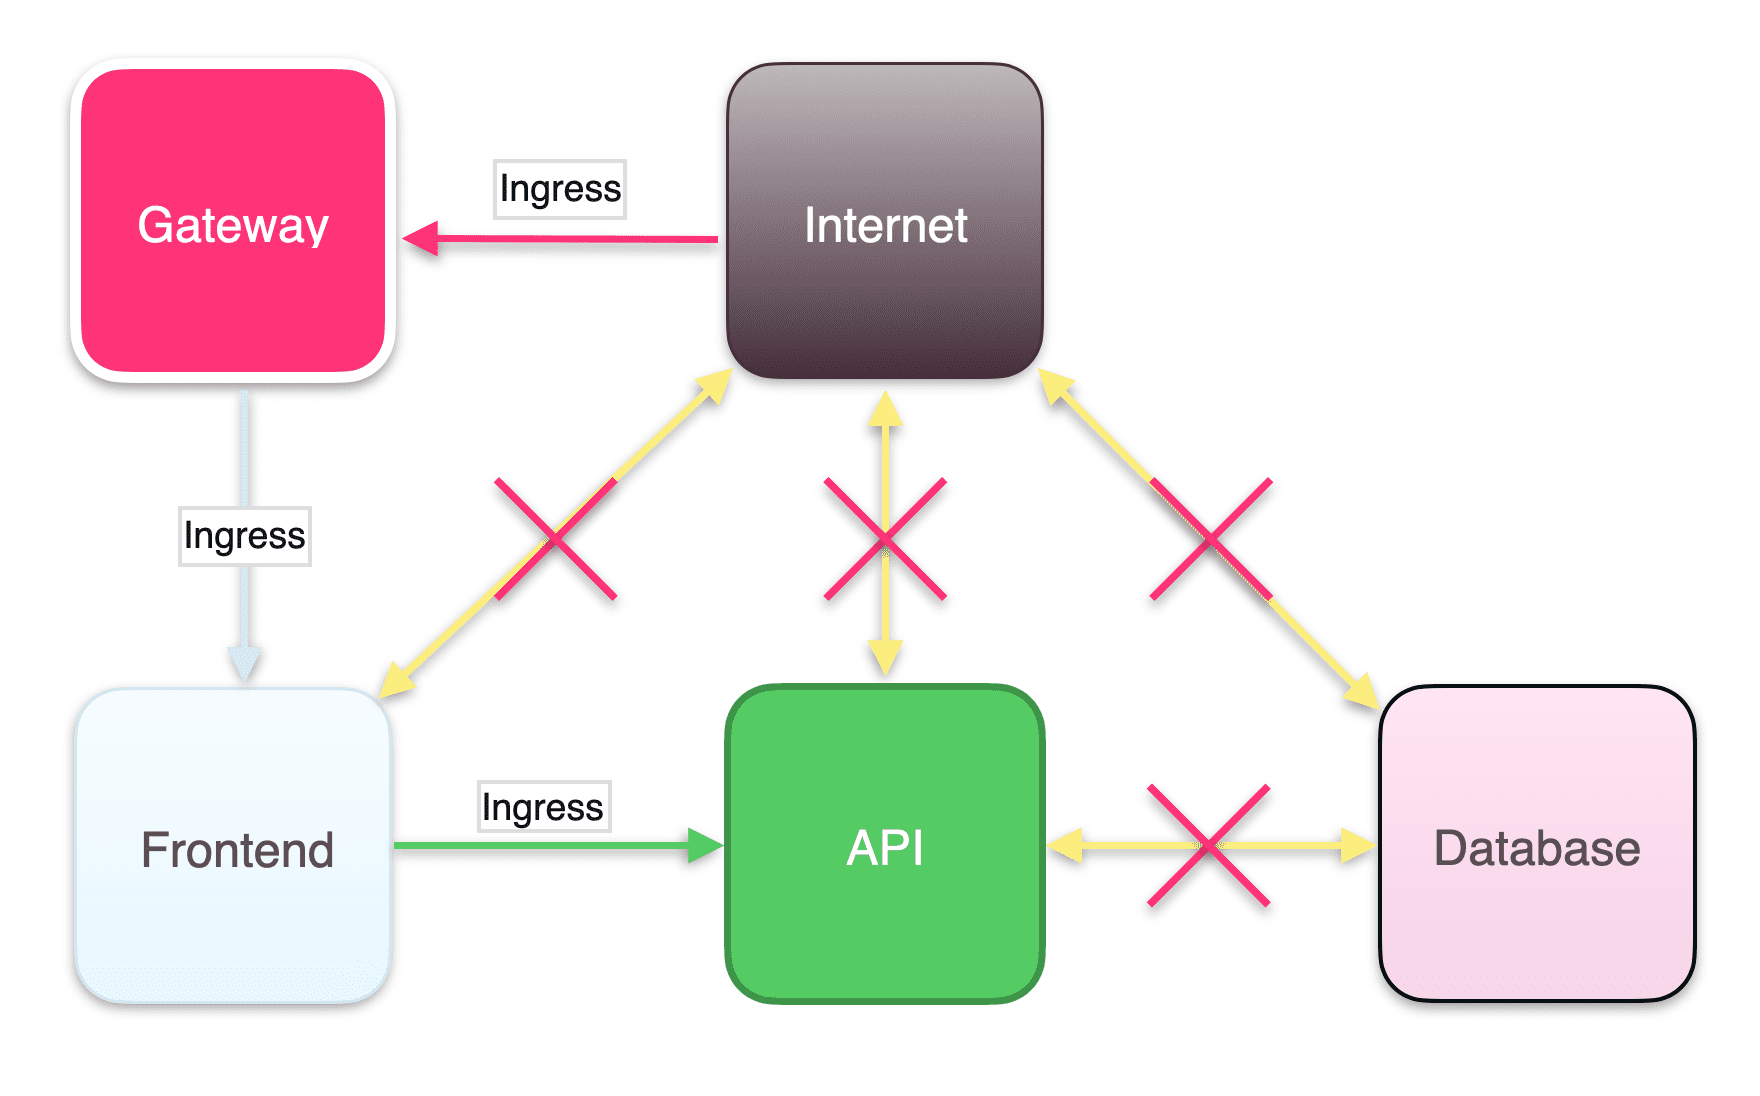
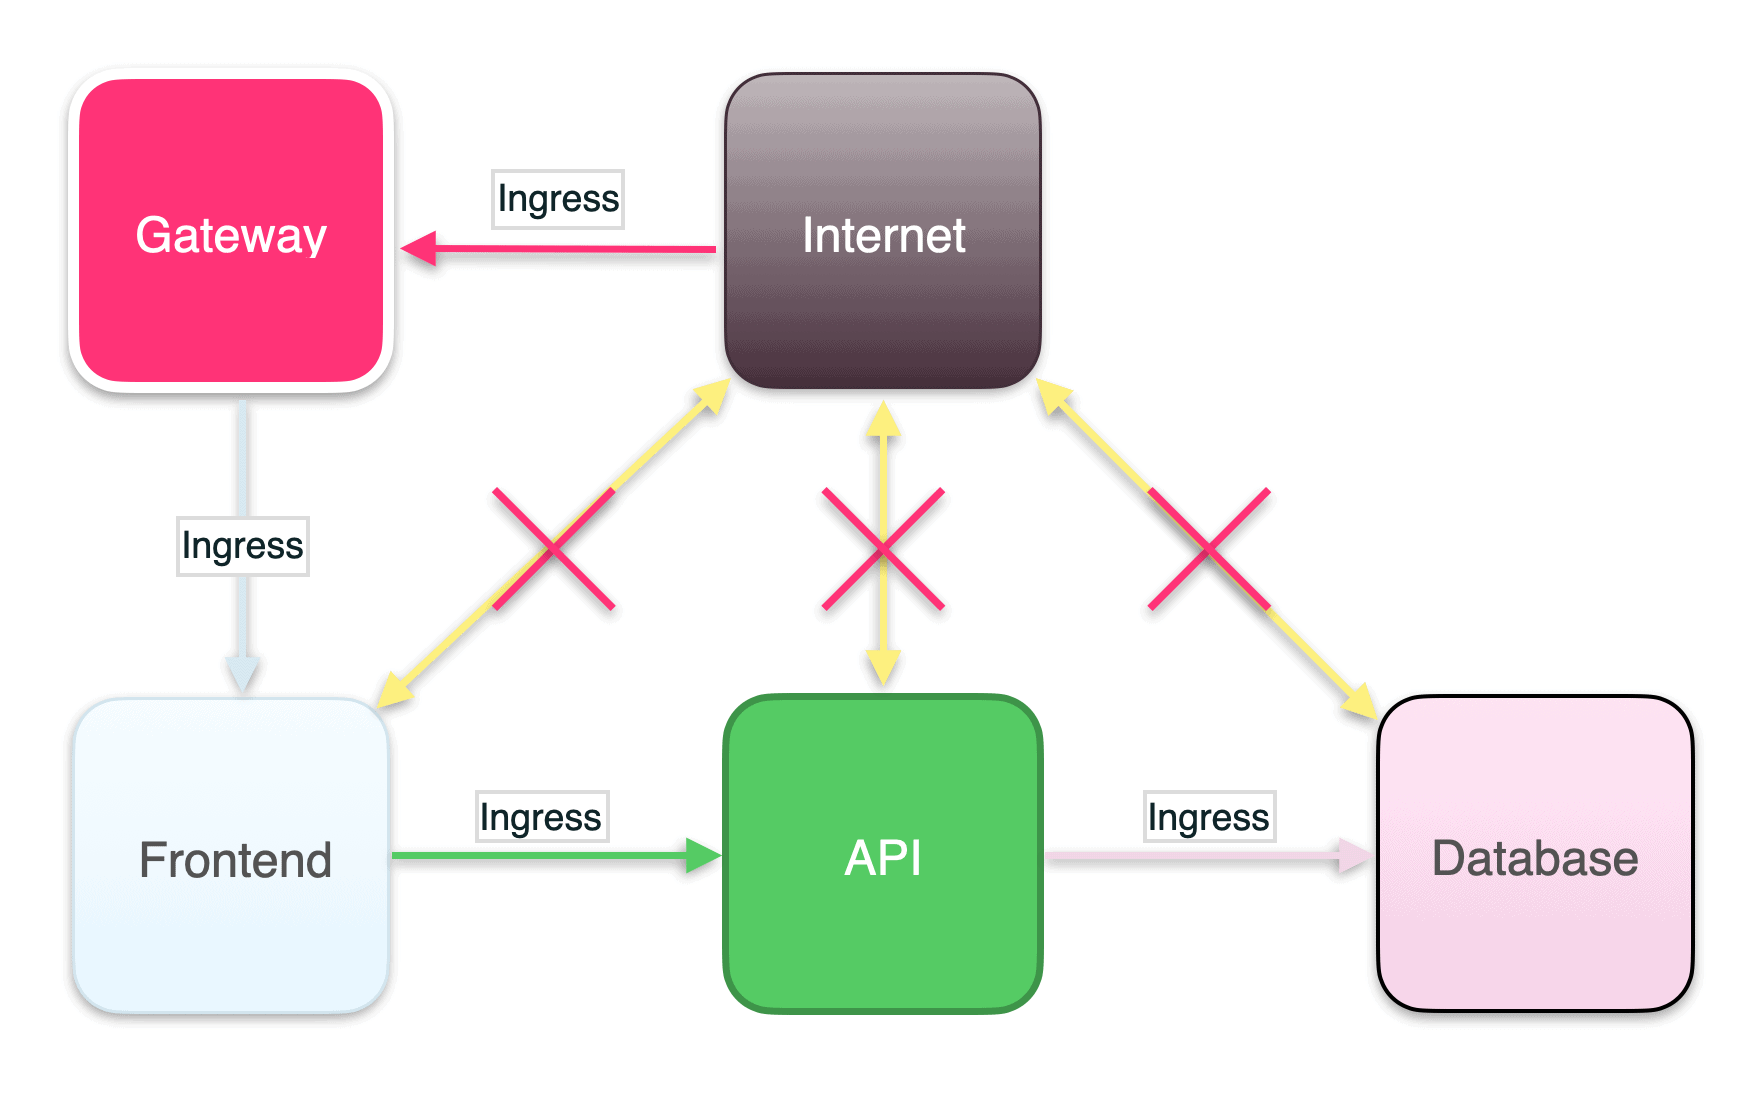
Given a simple application with a frontend, an API, and a backend database, the minimum policy configuration needed to secure your network boils down to these.
1. Deny all ingress traffic
Ingress rules specify which inbound traffic is allowed by each service. Since Kubernetes allows all inbound and outbound traffic by default, you will first need to deny all external ingress traffic as well as ingress traffic between services within your application stack and then carefully add in the particular ingress connections necessary to run your application. Some applications, such as financial systems, may also need to deny all egress traffic, or traffic going outbound.
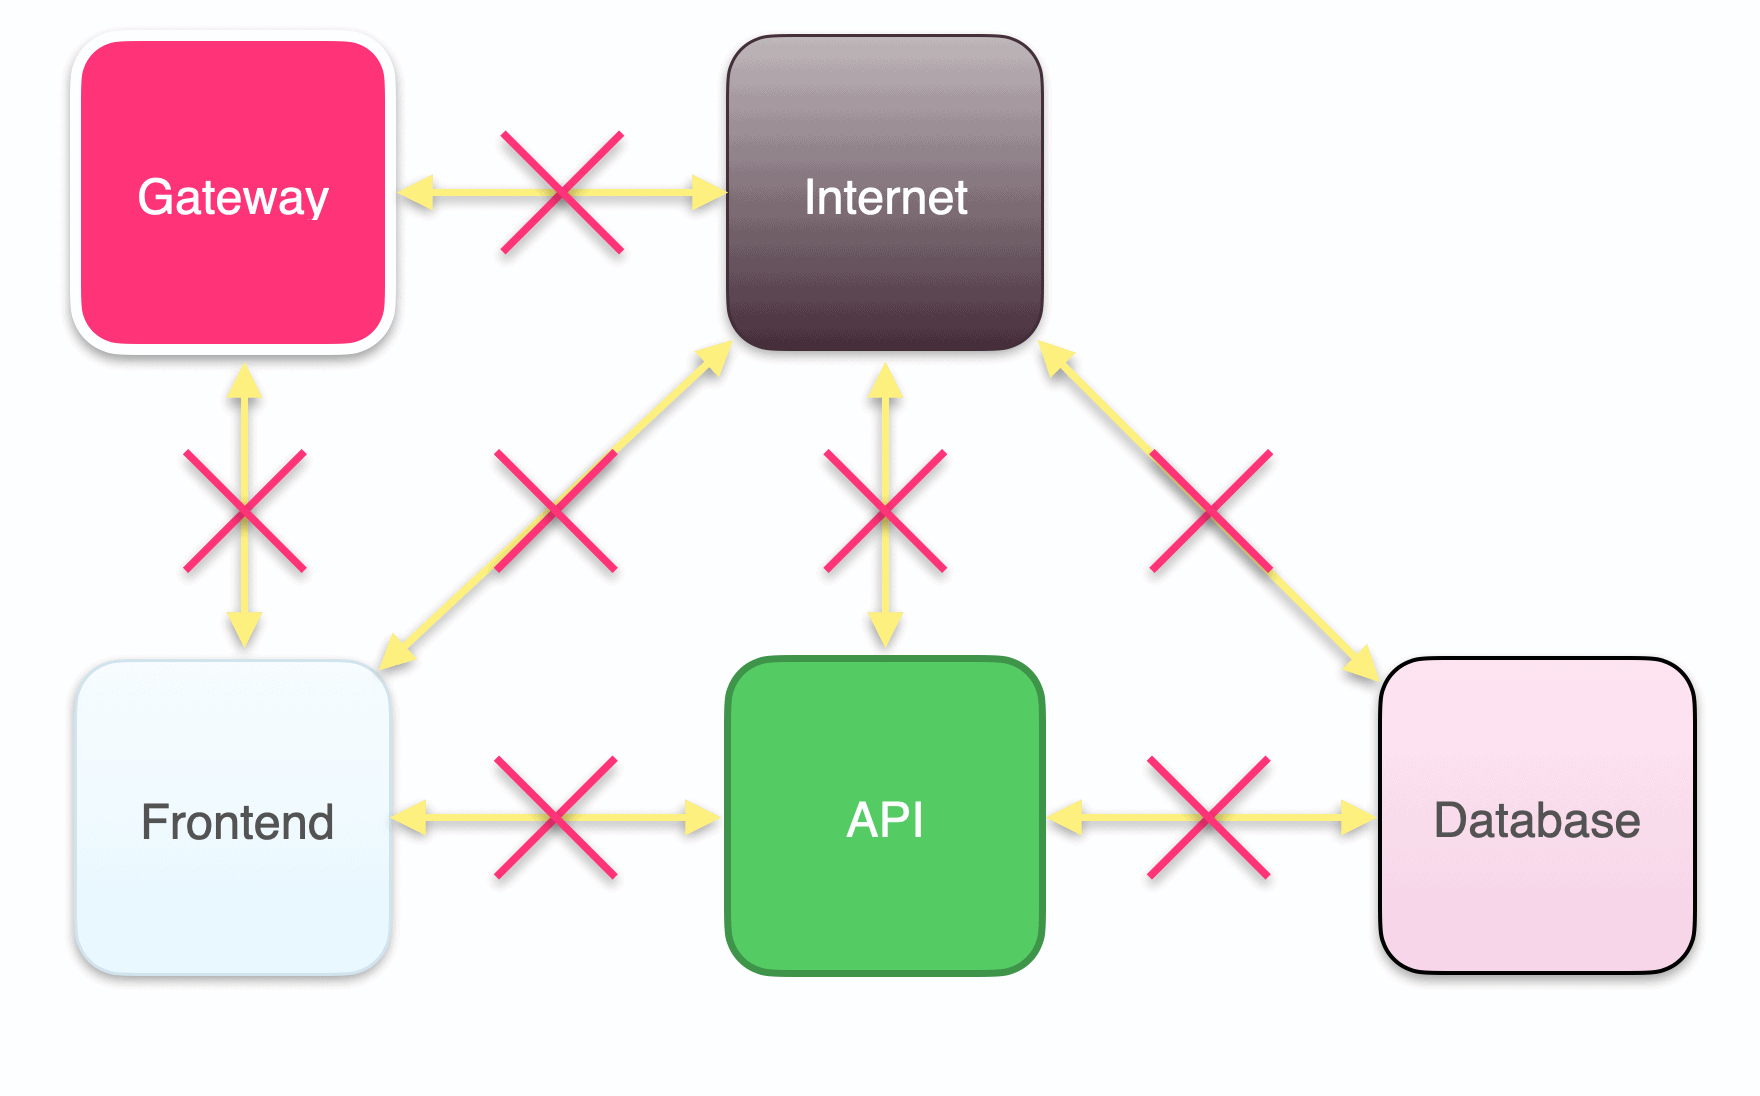
2. Set up an API gateway
Your individual services typically don’t have publicly accessible IP addresses. To allow users to reach those services without exposing them externally, use an API gateway, such as traefik or kong, to intercept traffic from outside your cluster and route it to the services and pods inside your cluster. Then users can utilize your application through the public IP address of the API gateway, and you can control where the traffic gets routed within your application stack.
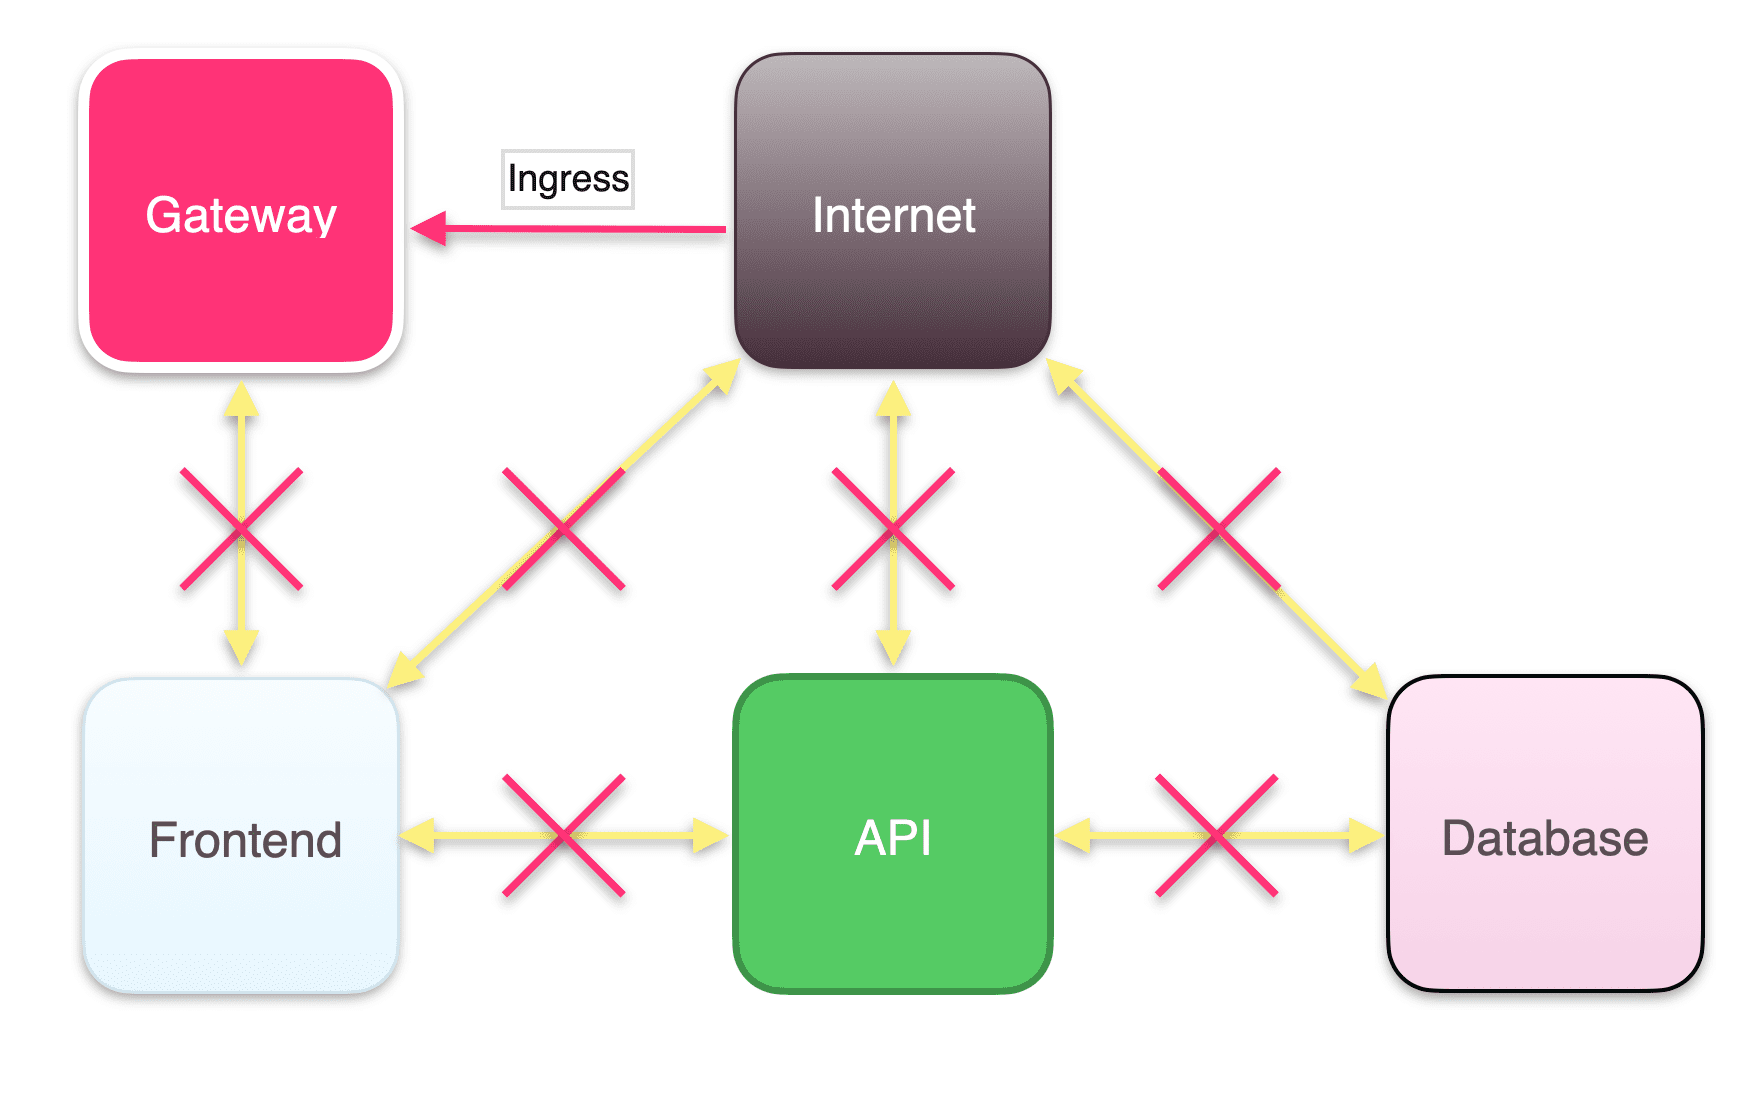
3. Configure ingress for your gateway
The gateway makes your applications reachable and handles routing traffic to and from the entry point of your application stack. You’ll need to define an ingress rule so that it can receive traffic from the outside world.
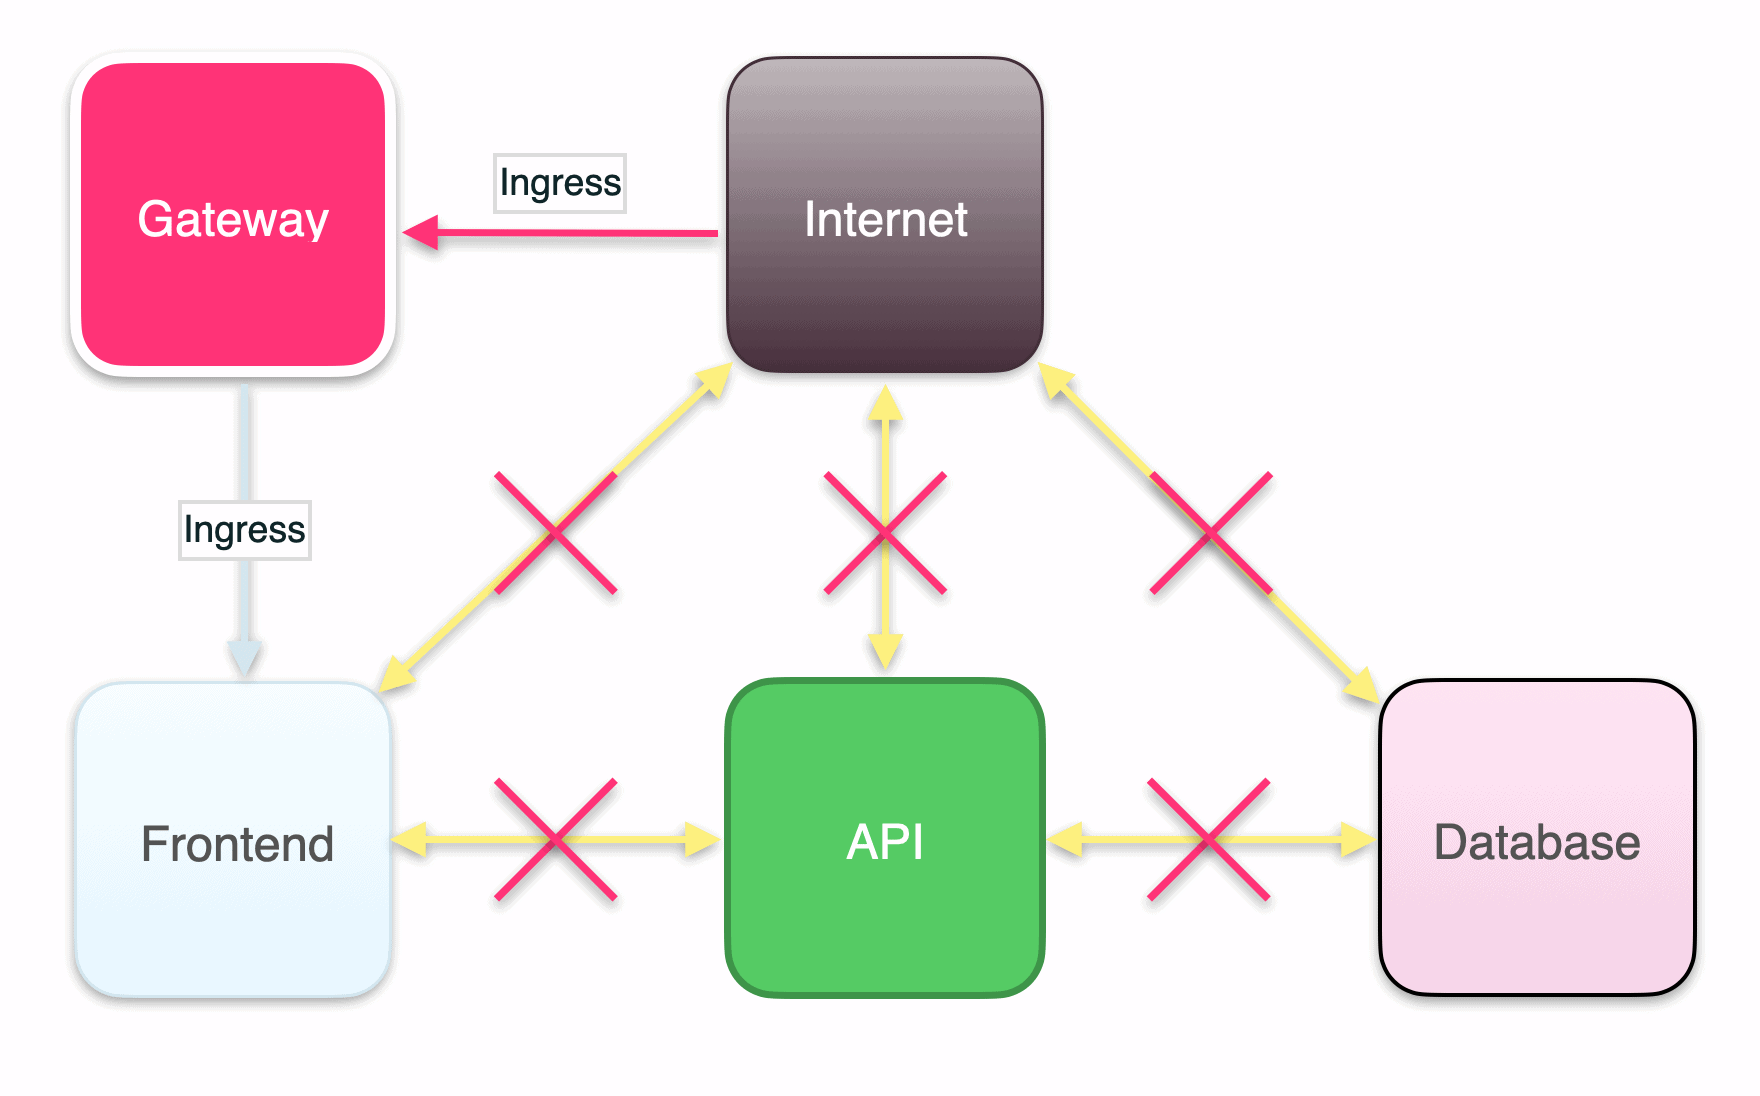
4. Configure ingress for your frontend application
Configure ingress for your frontend application so it can receive traffic routed to it by the gateway.
5. Configure ingress for your API
You’ll need to configure ingress for your API service to receive traffic from the frontend.
6. Configure ingress for your database pod
Finally, you must configure ingress from your API service to your database to complete the connections necessary to run this example application stack.
Once you have configured these Kubernetes Network Policies, you are on your way to creating a zero trust network in your cluster.
What about egress?
Egress rules specify which outbound traffic your service is allowed to send. For some systems, such as financial applications, egress rules may be configured to protect your services from accidentally sending traffic to an unauthorized endpoint. For most applications, configuring ingress rules and leaving egress open is enough protection.
Learn more about microservices architecture best practices
There are many benefits to a microservices architecture once you learn the ropes. To find out more best practices, check out these other posts on the Architect.io blog:
- Microservice Tools: The Top 10 for Monitoring and Testing
- The CI/CD pipeline: A developer’s guide
- Microservice orchestration or choreography: Which one do you need?
As always, feel free to hit us up with comments and suggestions on Twitter at @architect_team!
Add your thoughts